

Prerequisites
This article assumes you have a basic understanding of web development, OpenAPI Specification v3 (OAS3) and HTTP, you know how to use npm or yarn and you don’t fret a command line.
Introduction
I’d like you to reach back in your memory to the last time you built a web application.
Remember when you (the front-end person) and "The API Team" had to sync over an API to build a feature together?
It could go something like:
You: Hey folks, we’ll need an API to get a list of scooters. They should have fields like energyLevel, mileage, and coordinates. Can we coordinate that with you somehow?
API Team: For sure! Let’s do a whiteboard design session. As soon as we agree on the interface go ahead and start working on the front-end. Interfaces won’t change so just hardcode values in your code for now.
Later…
You: Hi "API Team"! We’ve integrated front-end with your API and everything crashed… I thought we agreed on energyLevel? Why is it energy-level instead? And wasn’t the API response supposed to be JSON, not a string encoded JSON?
API Team: Didn’t you read the latest design docs PDF on "The Company Documentation Website Size Of The Universe"? We updated it two days ago. We thought you caught up.
Does it sound familiar? If you ever:
- waited for an API to be finished before you started working on a UI
- had to mock your APIs manually
- had to deal with changing APIs and/or design inconsistencies
then keep on reading. This article will teach you how to solve these problems using Prism.
What will you build and learn?
In this tutorial, we will build a simple flight check-in API specification and use Prism to mock the API without writing a single line of code.
By the end of this tutorial you will learn:
- What Prism is and how to use it to create a mock server
- How to create a simple OpenAPI description file
- How to return static & dynamic examples
- How Prism validates parameters
- How to force Prism to return a specific response example
Note: Examples in this tutorial are oversimplified but the scenario is realistic.
Imagine an airline company "Dodo Airlines" and a travel agency "Halik Adventures".
Halik Adventures wrote a top-selling travel checklist app from which users can manage their packing list, and tasks to do before the journey begins.
To improve user experience, Halik came up with an idea to allow users to check-in to a flight directly from the application. They asked Dodo Airlines to provide them with a check-in API.
Dodo agrees but instead of asking Halik engineers to wait until the API is implemented, they send them an OpenAPI description file.
Halik engineers can use that file to create an HTTP mock server and start writing their front-end app before the API is deployed.
That’s where Prism comes into play!
Getting started
What is Prism
Prism is an OpenAPI-driven HTTP mock server. It’s built on the premises of the Design-First methodology where a specification is fundamentally the source of truth of an API.
Prism takes the OpenAPI description file and creates an HTTP server exposing all operations defined in that file.
Prism is arguably one of the most complete implementations of the HTTP mock server with regards to OpenAPI.
Some of its features are:
- Static response generation (using provided examples)
- Dynamic response generation
- Input parameters validation
- Security validation support
- Complex mime-types support
- And many others including things like allowReserved or nullable JSON Schema examples
Installing Prism
In this tutorial, we will use an npm package (but feel free to download one of the executables).
To install Prism CLI run the following command in your terminal:
npm install -g @stoplight/prism-cliCloning the tutorial repository
All the below examples can be found in https://github.com/11sigma/prism-tutorial.
Go ahead and clone it.
git clone git@github.com:11sigma/prism-tutorial.gitCreate a minimal OpenAPI file and run Prism
The first endpoint we’ll create will return passenger’s information.
Before letting the user to check-in Halik engineers need to know user’s current check-in status, and (to make the example more realistic) some other information like seat number, and barcode data.
Let’s create the first OpenAPI description file and add /check-in/passengers path to it.
Note I’m using Stoplight Studio to create the OpenAPI files but simple text editor will do the trick as well.
Open the project and take a look at references/flight-check-in-step-1/openapi.yaml
openapi: 3.0.0
info:
  title: Flight Check-In Step 1
  version: '1.0'
paths:
  /check-in/passengers:
    get:
      summary: Your GET endpoint
      tags: []
      responses: {}
This file describes a single GET endpoint but doesn’t define any response.
Running the first mock server
Even something so simple as the above is enough to run a server. It won’t do much but it’ll demonstrate how to run Prism.
Go to the project directory in your terminal and run the following command:
prism mock reference/flight-check-in-step-1/openapi.yamlPrism will list all mocked endpoints and tell you what port it’s listening on.

See what happens when you try to make a request to an endpoint.
Note jcurl is a customized curl I use to output formatted JSON responses.
curl 127.0.0.1:4010/check-in/passengers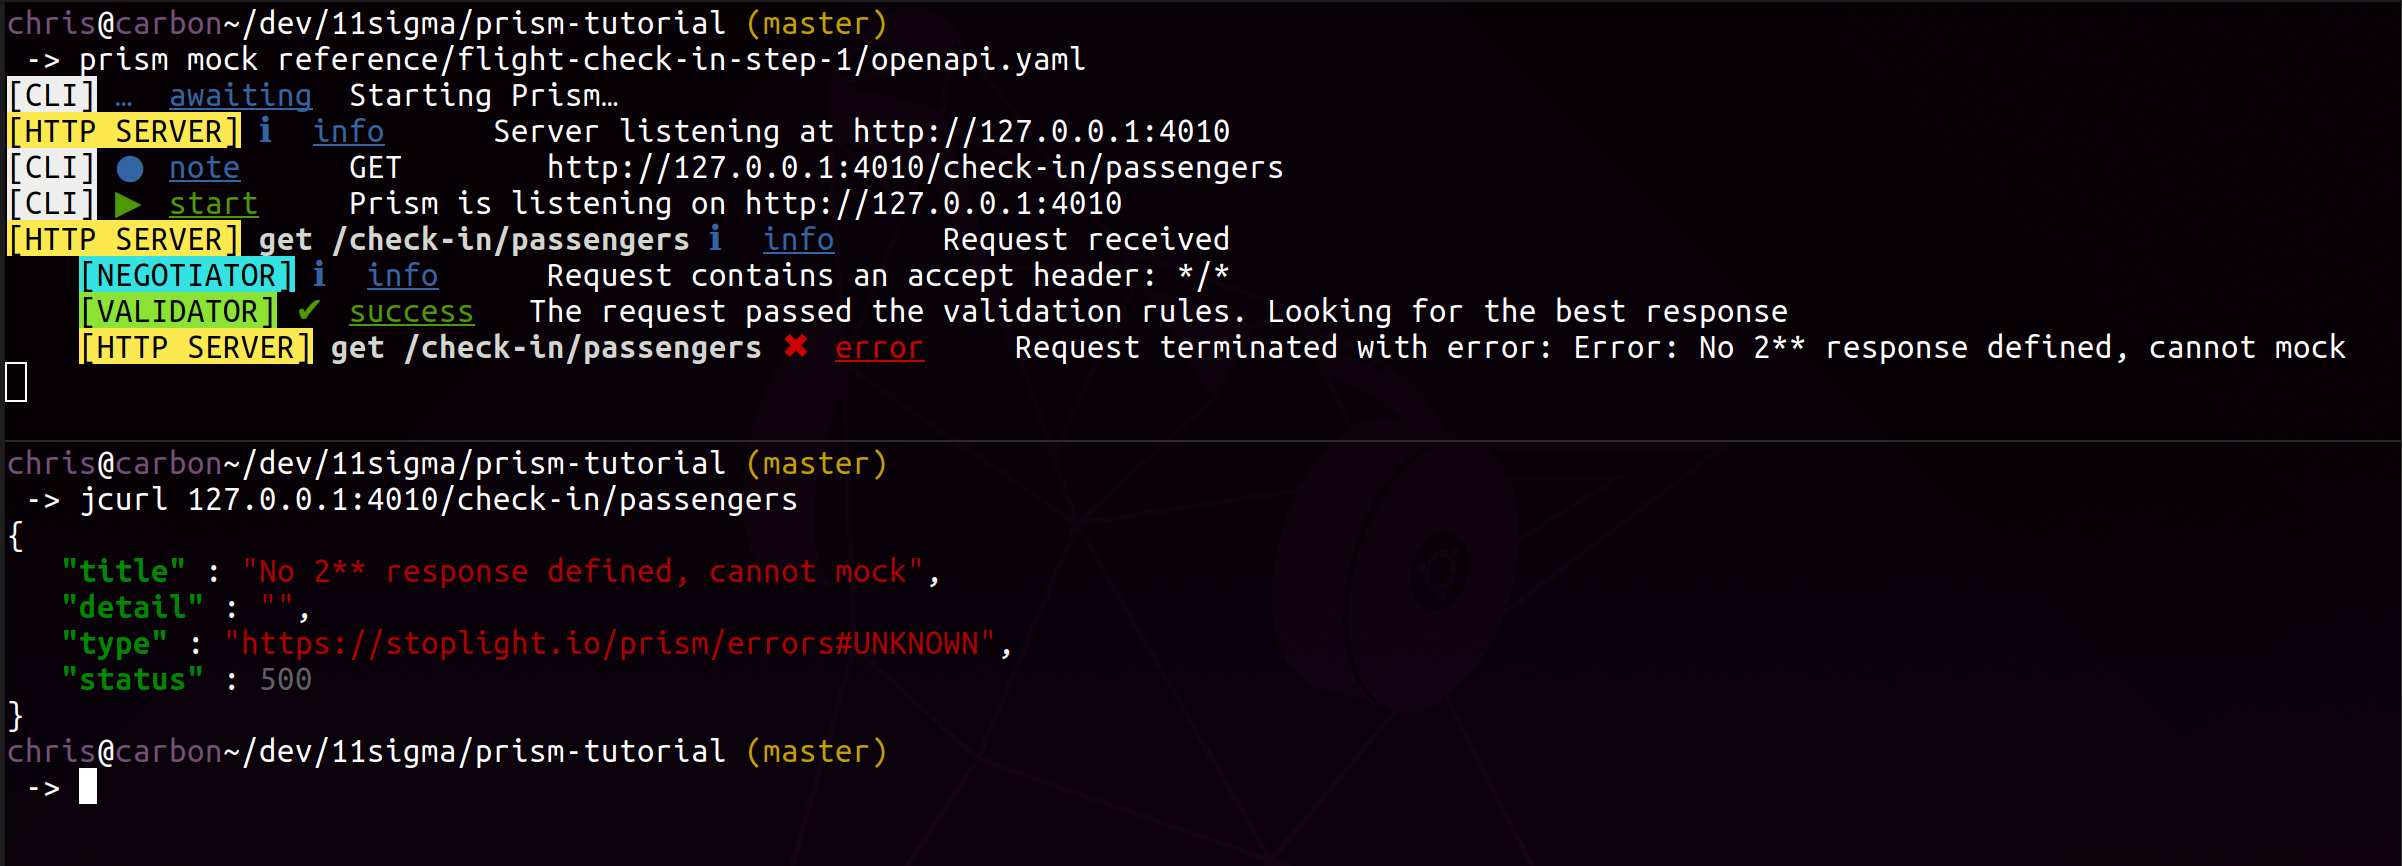
Ok, great, first error, did we break Prism?
Not at all, Prism is just telling you what’s wrong. If you read the logs carefully you’ll notice that Prism complains about lack of response messages. That’s good – Prism is design-driven! If you want to get a response you must be explicit.
We’ll fix that now by adding an example response.
openapi: 3.0.0
info:
  title: Flight Check-In Step 1
  version: '1.0'
paths:
  /check-in/passengers:
    get:
      summary: Your GET endpoint
      tags: []
      responses:
        '200':
          description: OK
          content:
            application/json:
              examples:
                checked-in-passenger:
                  value:
                    barcodeData: s0m3numb3r5
                    checkedInStatus: CHECKED_IN
                    seatNumber: A3
Run prism mock reference/flight-check-in-step-2/openapi.yaml and then request the same endpoint curl 127.0.0.1:4010/check-in/passengers.
You should get the following response:
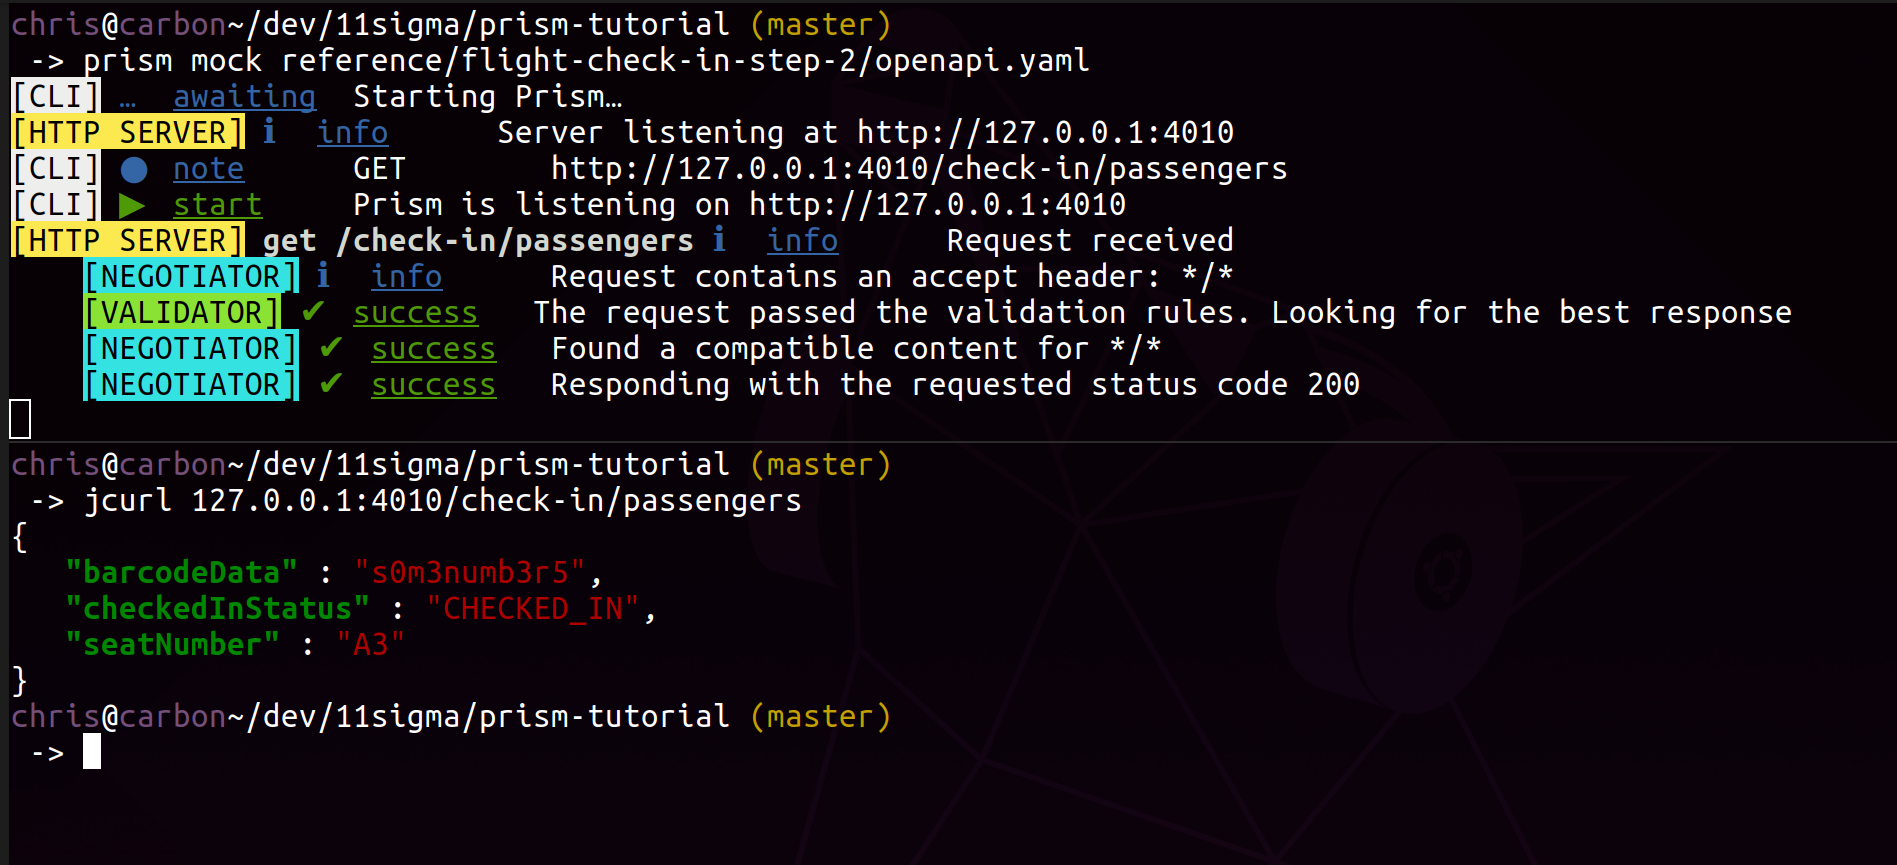
- Upper terminal: Prism logs.
- Bottom terminal: a response message matching the example.
Extend the API
Add a referenced Flight model and generate a dynamic response
So far we’ve created a simple API with one endpoint. In this step, we’ll extract the response to a common model and reference that model from the endpoint’s response.
Here is how that looks in the Stoplight Studio I’m using.
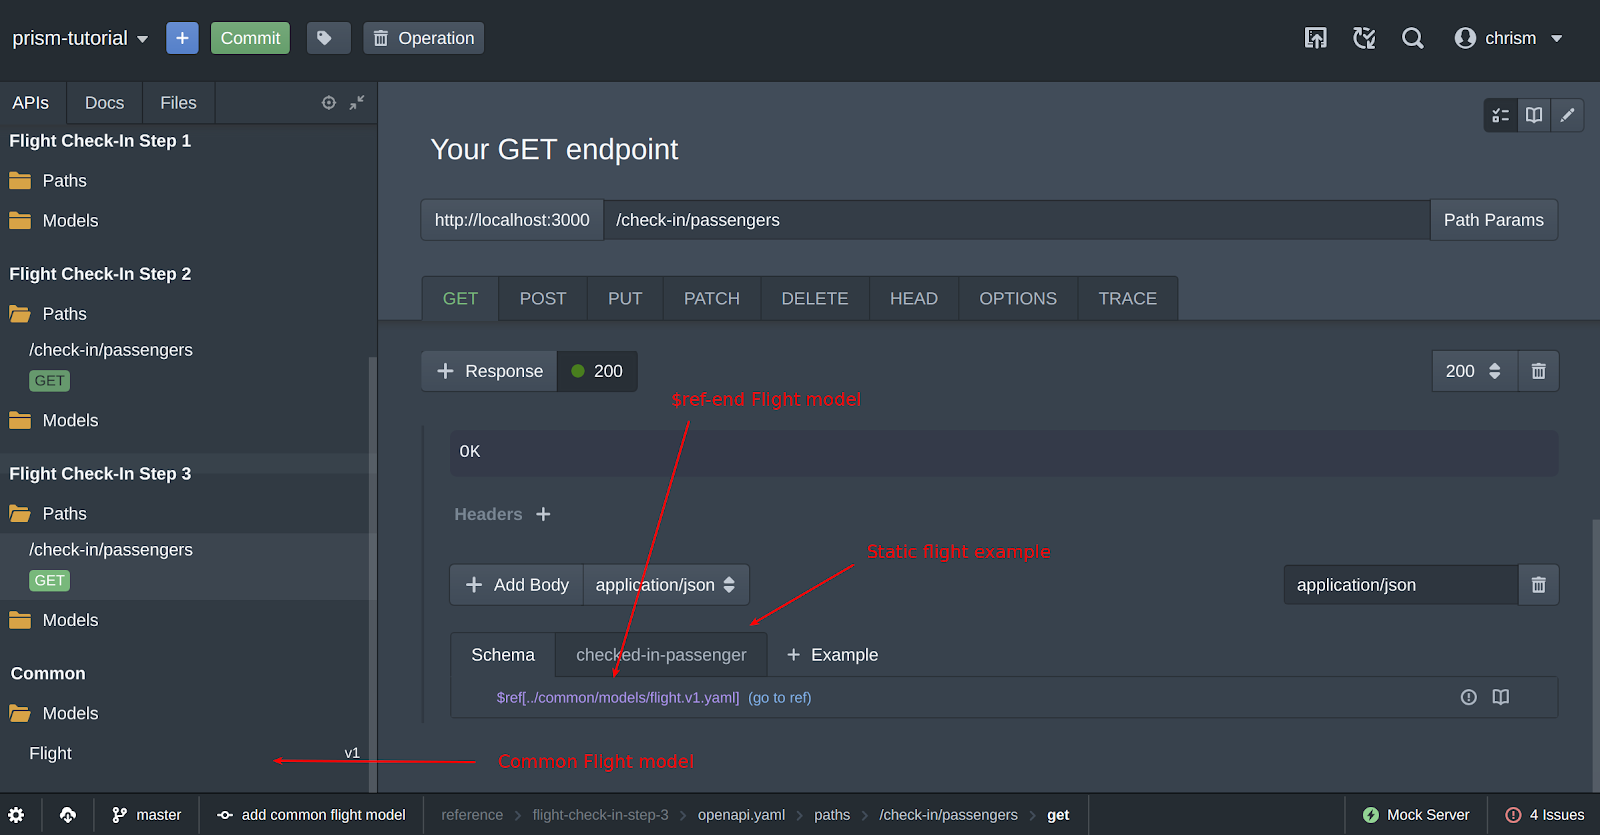
Please investigate the Flight Check-In Step 3 API (reference/flight-check-in-step-3/openapi.yaml) API. See that we’ve added a schema to the GET /check-in/passengers 200 response.
schema:
  $ref: ../common/models/flight.v1.yaml
That $ref points to an external file. Prism can resolve external references easily!
common/models/flight.v1.yaml
title: Flight
type: object
properties:
  barcodeData:
    type: string
    format: binary
  checkedInStatus:
    type: string
    enum:
      - CHECKED_IN
      - NOT_CHECKED_IN
      - BOARDED
  seatNumber:
    type: string
    example: F2
    pattern: '^[A-Z][1-9]$'
Take a moment to analyze the model. Here are some points worth noting:
- The response is an object
- That object has three properties: barcodeData, checkedInStatus, seatNumber
- barcodeData is a string and should be a binary
- checkedInStatus is a string and is an enum
- seatNumber is a string and must follow a specific pattern. For example, A4 is correct but 123 is not.
There are two ways to force Prism to return a dynamically generated response:
Run Prism in dynamic mode
prism mock --dynamic reference/flight-check-in-step-3/openapi.yamlNote the –dynamic flag. It will start Prism in a "dynamic" mode meaning that Prism will first attempt to generate a response for you. If it fails, it will return an error message reminding you to set the schema.
Force dynamic response per request
The other way to force a generated response is to append the __dynamic=true query parameter to the request.
For this example, we will use the latter method.
Run Prism again and make a request to it like so:
curl 127.0.0.1:4010/check-in/passengers?__dynamic=trueIn response, you’ll get something like:
{
  "checkedInStatus": "BOARDED",
  "barcodeData": "ut ut adipisicing in fugiat",
  "seatNumber": "B4"
}
The format of the response is the same but the actual data is generated dynamically.
Select response example by a key
You may want to have more control over the response you get back from a server. Maybe you need to test a UI that relies on checkinStatus to be NOT_CHECKED_IN. At the same time, you may not want to change the default response.
You can achieve this by adding another example to your response and selecting the response with the __example query parameter.
Run Prism with the "Step 4" Open API file:
prism mock reference/flight-check-in-step-4/openapi.yamlThen make the request:
curl http://127.0.0.1:4010/check-in/passengers?__example=not-checked-in-passengerThe __example query parameter allows you to specify the example by its key. The returned value, in this case, should be:
{
  "barcodeData": "s0m3numb3r5",
  "seatNumber": "A3",
  "checkedInStatus": "NOT_CHECKED_IN"
}
Query parameters validation
We’ll finish illustrating this endpoint by adding two simple query parameters and showing how Prism deals with validating them.
Now bear with me on that example. You may notice that this isn’t a proper REST design. You’re right, it would probably make more sense to use path parameters instead. Unfortunately, Prism 3.1.1 doesn’t support path param validation yet. I reported a feature request and by the time you read this article, it may be implemented already!
Open "Step 5" Open API file and take a look at the endpoint’s parameters property.
parameters:
  - schema:
      type: string
      pattern: '^[A-Z]{2} [1-9]{4}$'
      minLength: 0
    in: query
    name: flightNumber
    required: true
We’ve added a required parameter flightNumber which must follow a particular pattern (two letters must be followed by whitespace and four digits).
Run Prism:
prism mock reference/flight-check-in-step-5/openapi.yamland try to make one of the calls:
curl 127.0.0.1:4010/check-in/passengers
# OR
curl 127.0.0.1:4010/check-in/passengers?flightNumber=XYZ
You will get an error response each time. The second response should be:
{
  "type": "https://stoplight.io/prism/errors#UNPROCESSABLE_ENTITY",
  "title": "Invalid request body payload",
  "validation": [
    {
      "location": ["query", "flightnumber"],
      "severity": "Error",
      "code": "pattern",
      "message": "should match pattern \"^[A-Z]{2} [1-9]{4}$\""
    }
  ],
  "status": 422,
  "detail": "Your request body is not valid and no HTTP validation response was found in the spec, so Prism is generating this error for you."
}
problem+json header
Let’s pause here for a second to observe the format of the error you get back in the response.
Make the following call to include response headers in the output (notice the -i flag).
curl -i 127.0.0.1:4010/check-in/passengers?flightNumber=XYZSee that the content-type is application/problem+json. Stoplight team decided to use the RFC 7807 proposed standard which makes it easier to understand what a problem is about.
Validate request body
Go ahead and check out "Step 6" of this tutorial. Pay attention to endpoints and see that we’ve added POST check-in.
This emulates a hypothetical endpoint you’d use to check-in a passenger. It replies with the same type of response the other endpoint does (we’ve reused a common model to make things simpler) but expects a request body additionally.
In this section, you’ll learn that Prism can also validate request bodies.
/check-in:
  post:
    requestBody:
      content:
        application/json:
          schema:
            $ref: ../common/models/passenger.v1.yaml
See how we defined the passenger model:
common/models/passenger.v1.yaml
title: Passenger
type: object
properties:
  firstName:
    type: string
    pattern: '^[A-Z][a-z]+$'
  lastName:
    type: string
    pattern: '^[A-Z][a-z]+$'
  passportNumber:
    type: number
    minimum: 1
    maximum: 9
  dateOfBirth:
    type: string
    format: date
required:
  - firstName
  - lastName
  - passportNumber
An example of a valid request body would be the following JSON:
{
  "lastName": "Reeves",
  "firstName": "Keanu",
  "passportNumber": 9,
  "dateOfBirth": "1964-09-02"
}
If you try making a request with something that doesn’t match this schema, you’ll get a problem+json response back. Try this:
curl -H "Content-Type: application/json" -X POST --data '{ "firstName": "rob", "lastName": "Schneider", "dateOfBirth":"10-31-1963", "passportNumber": 123456789 }' localhost:4010/check-inYou will get three errors back:
- Invalid first name
- Invalid date format
- Invalid passport number
Add HTTP security
One of the coolest features when it comes to validation is, in my opinion, security validation. In this section, we’ll add an "API Key" security to both endpoints and will find out what happens when an invalid (or no) key is provided.
Check out "Step 7" and open the description file. Near the end of the file, you’ll see a new component entry with securitySchemes defined.
components:
  securitySchemes:
    API Key:
      name: x-api-key
      type: apiKey
      in: header
To use this security, we need to list it explicitly in both endpoints. We’ve added a security property to each of them and listed API Key as the only security measure (just for your information: you can set multiple securities).
Run Prism with the description from this step and make such request:
curl -H "Content-Type: application/json" -X POST --data '{ "firstName": "Keanu", "lastName": "Reave", "dateOfBirth":"2019-12-12", "passportNumber": 1 }' localhost:4010/check-inYou will get a 401 response!
Now try this to get 200:
curl -H "x-api-key: password" -H "Content-Type: application/json" -X POST --data '{ "firstName": "Keanu", "lastName": "Reave", "dateOfBirth":"2019-12-12", "passportNumber": 1 }' localhost:4010/check-inThis example closes the input validation introduction. Prism can validate nearly all input data you send to it. It uses the Open API description file and the embedded JSON Schemas to verify your request. This puts your design files in the center of your API universe and shortens the feedback loop.
If one of the endpoints changes you don’t have to exchange e-mails and whiteboard snaps with your API team.
Prism tells you precisely what’s wrong so you don’t have to guess or even read the documentation. Easy and fun.
I hope you’ve enjoyed this little tutorial. Prism can do much more than what we’ve covered here but this should hopefully get you started.
Happy mocking!